How to Organize a Pantry: The Zone System That Ends Food Waste
Organize your pantry with a professional method: full inventory, the FIFO system, height-based zones, pest control, and biweekly upkeep. A complete guide from a personal organizer.
Neste guia você verá:
- 01Why do pantries turn into a mess even with plenty of space?
- 02Why is inventory the first step?
- 03How does the height-zone system work?
- 04What is the FIFO method and how does it end waste?
- 05How do you prevent weevils and moths in the pantry?
- 06Container and size guide
- 07How do you keep the pantry organized in 15 biweekly minutes?
Why do pantries turn into a mess even with plenty of space?
If you have ever opened your pantry and could not find the spice you were looking for, had to push aside a stack of packages just to grab the salt, or discovered an expired product hidden at the back of a shelf, you are not alone. A messy pantry is one of the most common complaints I hear from clients.
In most cases, the problem is not a lack of space. It is a lack of system. When there is no clear logic for where each product belongs and how new groceries should be stored, chaos sets in naturally, and it builds up with every trip to the supermarket. The pantry is part of a larger system: if you want to understand how it fits into organizing the whole kitchen, the kitchen organization guide connects every space.
There are four main causes behind it:
- No restocking system: when new groceries arrive, the packages get placed in front of the ones already there. The older products end up buried in the back, invisible, and expire before they get used.
- No defined zones: pasta sits with spices, rice shares space with cookies, olive oil sits next to dish soap. When everything gets mixed together, no one knows where to look, and no one puts things back in the right place.
- Poor packaging: original cardboard boxes are fragile, attract pests, and do not let you see the contents. Loose plastic bags tip over and spill. Industrial packaging was never designed for long-term storage at home.
- Ignored expiration dates: without rotation, the products closest to expiring stay hidden behind the new ones. Food spoils before it gets eaten, and the financial waste goes unnoticed.
All of these problems have practical solutions, and you do not need to renovate your pantry to fix them. You need a method. If your pantry holds specialty ingredients from international cuisines, see how to organize a gourmet kitchen pantry with specialty ingredients.
Why is inventory the first step before organizing?
The most common mistake people make when trying to organize a pantry is going straight to buying containers, bins, and organizers before knowing what they have and what they actually need. The result is a pantry that is still too full, now with organizers that do not quite fit the shelves or are too large for the products that remain.
The correct first step is always the inventory. And a real inventory starts with emptying everything out.
How to do the inventory correctly
Pick a day when you have time available: the process usually takes one to two hours depending on the size of the pantry. Empty every shelf completely, placing everything on the floor or a large table. As you take items out, check the expiration date on each one.
Be strict at this stage. Expired food is money thrown away and, in some cases, a risk of food poisoning. Opened packages that have sat for more than three months, for products meant to be consumed quickly (flours, cereals, nuts), should also be discarded: oxidation and humidity compromise both flavor and safety.
Split everything into two groups: keep and discard. There is no "maybe" group: if you are unsure about a product, it goes.
With the shelves empty, take the chance to clean them thoroughly. A damp cloth with diluted vinegar removes stains, odors, and any pest residue. Let everything dry completely before putting anything back.
Now group what is left by category on the floor: grains together, spices together, canned goods together, and so on. Measure the shelves. Only at this point will you know exactly which organizers you really need, and in what size.
- Empty the entire pantry at once
- Check the expiration date of every product
- Discard expired items and packages opened more than 3 months ago
- Clean the shelves with a damp cloth and vinegar
- Group items by category on the floor before putting them away
- Measure the shelves before buying any organizer
When I ask a client to empty everything out, the reaction is almost always the same: surprise at what was actually in there.
In a 90 m² apartment in Perdizes, a family of four called me to organize their pantry. The client thought she needed new containers and organizers. When we emptied everything out, I found two cans of tomato sauce from 2021, wheat flour with moths that had spread to the oat container next to it, and three open packages of pasta at once with leftovers mixed at the bottom of each one. The pantry had a smell that "had always been there." The discarded food added up to a meaningful amount. The family kept buying duplicate items because the pantry never showed them what was actually inside.
Once we finished the inventory and the cleaning, three shelves had room to spare and the fourth was completely empty. We did not buy a single organizer.
The takeaway: a pantry with a strange smell almost always has expired food or an undetected infestation. The inventory reveals the real state of things before any purchase decision.
How does the height-zone system work?
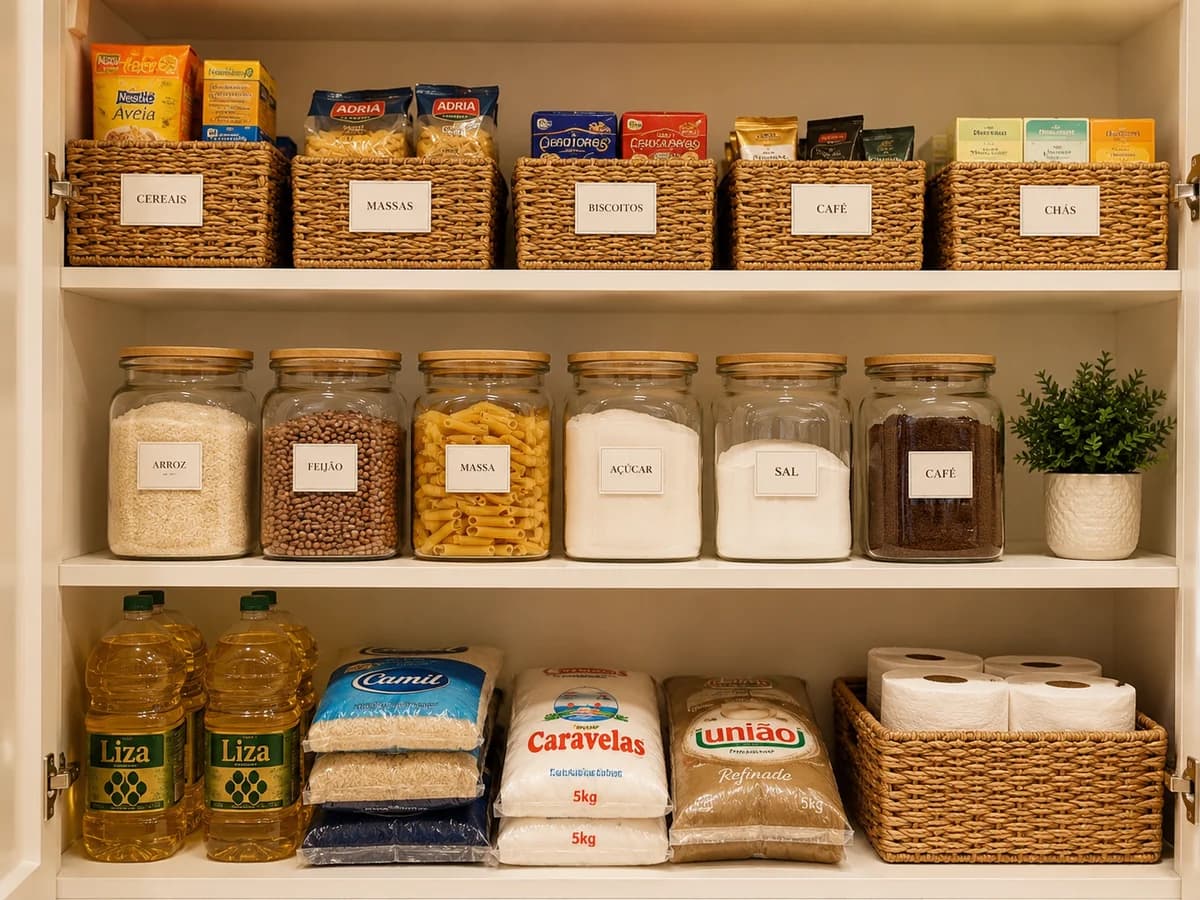
With the pantry clean and the products sorted by category on the floor, it is time to decide where everything will live. The height-zone system is the most efficient approach for home pantries because it respects ergonomics: the products you use most often go where they are easiest to reach.
Eye-level zone
This is the zone with the most access, no physical effort, and full visibility. It is where daily-use products live: oils, salt, sugar, rice, pasta, coffee, and the spices you reach for every day. Everything you need frequently should be visible without bending or stretching: your daily meal prep depends on it.
In this zone, transparent containers show stock levels without you needing to open anything: you know instantly when something is running low.
Reserve zone (top shelf)
The highest shelf is less accessible, and that is fine. It exists to hold backup stock, products bought in bulk, canned goods that will be used over the course of the month, and less frequently used items. To reach it, you will need a small stool or stepladder: that is expected and not a problem.
Organize the reserve zone with labeled boxes or bins by category. One box for extra grains, one for canned goods, one for preserves. Whatever is in front should be the first to get used.
Low zone (shelf closest to the floor)
The low zone is ideal for heavy items: large bottles of olive oil, water packs, and large bags of cereal, since it avoids the risk of heavy objects falling from high shelves. If there are no children in the house, cleaning products can also go here, in a clearly separate section from food.
Potatoes, onions, and garlic deserve special attention: they need ventilation and should not be kept in sealed containers. Wicker or perforated plastic baskets in the low zone are the ideal solution: good air circulation and easy visibility of stock.
A pantry with the right system for your household stops being the place where money quietly disappears.
See home organization services →What is the FIFO method and how does it end expired food?
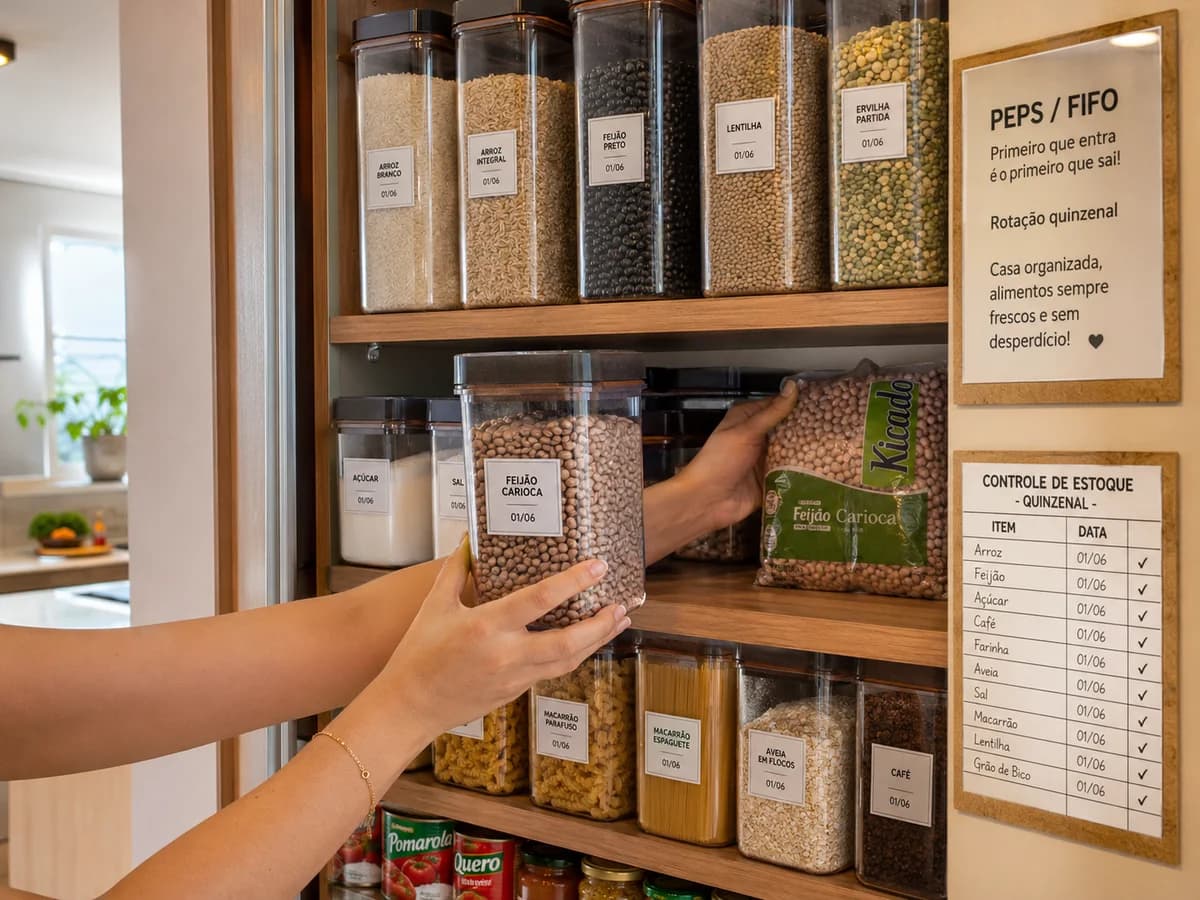
FIFO stands for First In, First Out: the same method used by supermarkets, restaurants, and any professional food operation to make sure older products get used before newer ones.
In practice at home, it works like this: every time you bring new groceries home, the new products go behind the ones already on the shelf. The older ones stay in front and get used first. That simple.
Why does this matter so much?
Without FIFO, the natural behavior is to stack new products in front of the old ones, because it is easier when putting groceries away. The older items keep getting pushed further back, until one day you discover a package of pasta that expired six months ago, hidden behind what you bought last week.
This single habit (always placing the new item behind the old) eliminates about 90% of household food waste related to expiration. It requires no products, no new organizers, no renovation.
Bulk purchases only go to waste when the newest product ends up in front of the cabinet. With a large bag of rice, the oldest one disappears from view in seconds.
In Campo Belo, a couple did biweekly bulk shopping. Each time, they bought a large bag of rice, among other items. When putting groceries away, they placed the new packages in front because it was faster. The older ones went to the back. Six months later, when we did the inventory, I found rice that had expired eight months earlier, two unopened packages of pasta from 2024, and a bag of beans buried under more recent purchases.
We installed two dispensers, one for rice and one for beans: the product comes out from the front while you refill from the top. The oldest stock comes out automatically first. We labeled the remaining containers with their opening date. At the three-month follow-up, not a single product had expired since they had moved into the apartment.
The takeaway: the habit of putting new items in front quietly builds up waste, two weeks at a time, without anyone noticing. Thirty extra seconds when putting groceries away prevents the waste before it accumulates.
How to apply FIFO in your pantry
- Front- or side-loading containers (dispensers): the product comes out from the bottom while you refill from the top, so the oldest stock automatically comes out first. Ideal for rice, beans, and sugar.
- Date labeling: when transferring products into containers, write the opening or purchase date with masking tape or an adhesive label. On your next shopping trip, you will know exactly which container is the oldest.
- The front rule: whenever you put away any product, place the new one behind it, no exceptions. Turn this into an automatic habit: within 3 weeks it becomes natural.
How do you prevent weevils and moths in your pantry?
São Paulo has a hot, humid climate for most of the year, perfect conditions for household pests to spread in pantries. The two most common ones in home kitchens are weevils and Indian meal moths, and both share something in common: by the time you see them, the infestation has already begun.
Weevils (Sitophilus oryzae and similar species)
Weevils are tiny beetles that reproduce inside grains: rice, corn, wheat, oats. The problem is that they often arrive straight from the supermarket: the eggs are already inside the grain when you buy it, invisible to the naked eye.
To spot them, hold the sealed package up against a light source and check for movement or small dark spots inside the grain. Packages with suspicious tiny holes are also a warning sign.
Indian meal moth (Ephestia kuehniella)
The Indian meal moth is even harder to spot in its early stage: the larvae are small and white, nearly invisible in light-colored flour. You usually notice the infestation only once you see adult moths flying around the kitchen, or find fine webbing inside packages.
How to prevent it: the control protocol
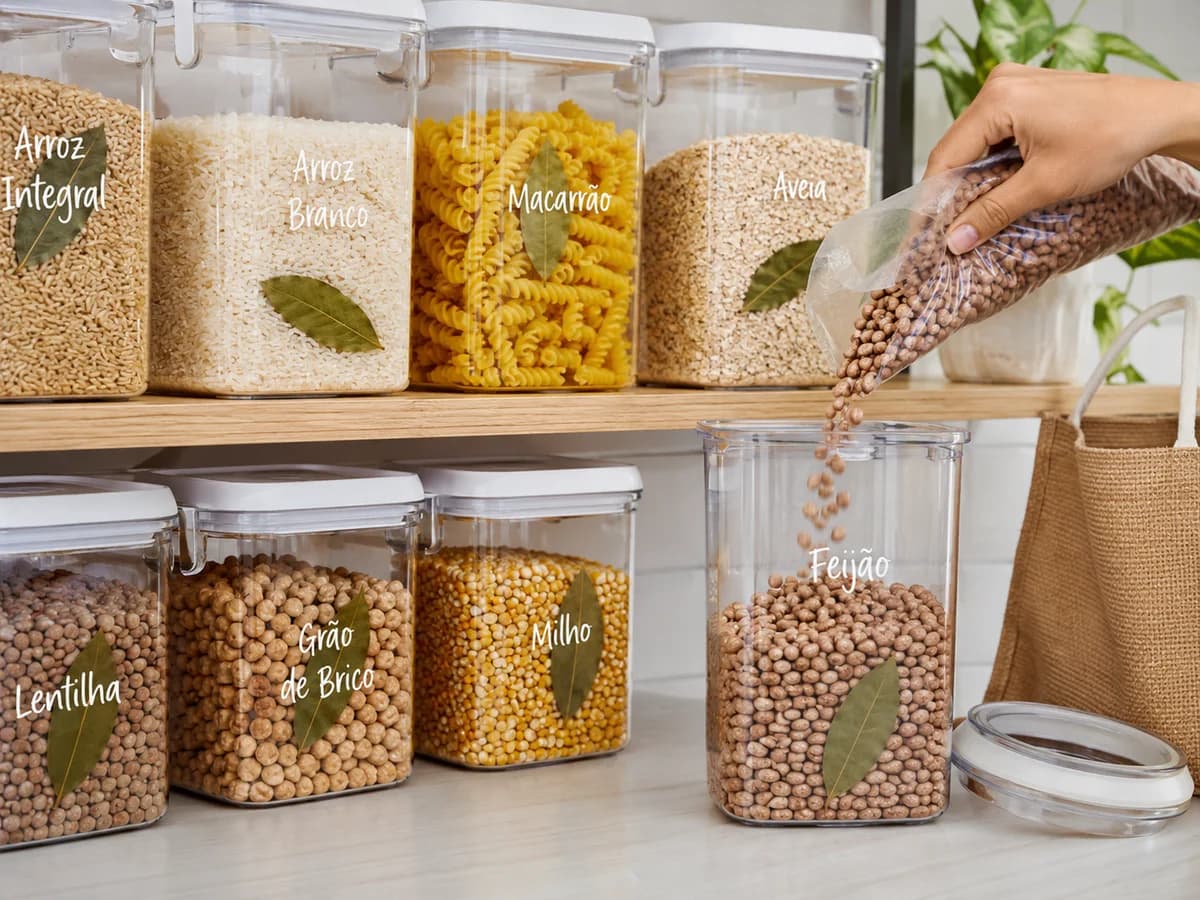
- Transfer immediately: every grain, legume, or flour you buy should be transferred into a rigid, sealed container as soon as it gets home. Never leave it in the original paper, cardboard, or thin plastic bag.
- Dried bay leaves in containers: place 1 to 2 dried bay leaves inside each grain container. The leaf's aroma naturally repels insects without contaminating the food. Replace every 3 months.
- Preventive freezing: before transferring new grains into containers, place the sealed packages in the freezer for 48 hours. The cold kills any eggs or larvae that may be in the product, with no pesticides and no chemicals. For the freezer to handle this without turning into a dumping ground, see how to organize the fridge and freezer by zones.
- Never mix old with new: when refilling containers, do not pour the new product on top of what remains. Empty the container, use up the leftovers, and then refill with the new product, applying FIFO.
- Container material: glass and rigid, food-grade plastic (polypropylene) are the only safe options. Insects cannot chew through them. Zip-lock bags, reused yogurt tubs, and thin plastic packaging offer no real protection.
Weevils rarely appear out of nowhere. They almost always start in one specific product and spread through neighboring packages that do not seal properly.
In Morumbi, a client called in a panic: her pantry had weevils. When we opened the containers, the infestation had spread across seven of them: rice, flour, oats, cornmeal, granola, and two more. It had started in a bag of rice bought on sale. The containers were reused yogurt and margarine tubs, none of them properly sealed. The insects moved from one to another through the gaps around the lids. The family had put insecticide inside the containers to try to fix it, which contaminated the food.
We discarded everything in the seven containers, cleaned the pantry, and replaced them with glass containers with rubber-sealed lids. Every new purchase now goes into the freezer for 48 hours before being transferred into containers. Over four months of follow-up, no reinfestation.
The takeaway: reused yogurt and margarine tubs do not seal properly. Weevils get through the gaps. The cost of good glass containers is lower than the cost of an infestation and everything that comes with it.
Container and size guide
One of the most common questions after the inventory is: what size container should I buy? Containers that are too small force you to keep the rest in the original packaging, right back to square one. Containers that are too large waste shelf space and leave products with unnecessary empty air, which favors moisture.
The guide below is based on the average consumption of a family of 4 in São Paulo with an active kitchen (cooking at home at least 5 days a week). Adjust up or down based on your family's habits.
Recommended capacity by product
- Rice (~5 kg/month): a container of at least 5 liters. If possible, with a wide opening to make it easy to use a measuring scoop.
- Beans (~2 kg/month): a 2 to 3 liter container. If the family eats different varieties, one container for each.
- Pasta (~2 kg across shapes): 2 to 3 liters per shape, or one larger mixed container if the family has no preference. Note: tall cylindrical containers work well for spaghetti; square ones are better for penne and fusilli.
- Wheat flour (~2 kg/month): a 3 liter container with a wide opening, making it easy to use a measuring cup inside the container without spilling.
- Sugar (~2 kg/month): 2 to 3 liters. Sugar tends to harden, so a well-sealed container with a silicone gasket in the lid solves that.
- Salt (~1 kg/month): 1 liter is enough. Choose a container with a screw-top lid: salt absorbs moisture and can clump.
- Ground coffee (~500 g/month): a 1 liter container, ideally opaque or kept out of direct light: coffee loses aroma when exposed to light.
- Spices and seasonings: containers of 200 to 500 ml each, or a spice rack mounted to the side of the pantry or on the wall near the stove.
What material should you choose?
Glass is the ideal material: it does not absorb odors, does not retain moisture, is impermeable to insects, lasts for decades, and lets you see the contents and stock level at a glance. The downside is the weight and the risk of breaking (more relevant if there are young children at home).
Rigid, food-grade plastic (PP: polypropylene, usually marked with the number 5 on the bottom of the container) is practical, lightweight, and durable. It does not absorb odors when washed properly and works very well for grains and flours. Avoid soft plastics or ones without food-grade markings.
What to definitely avoid: reused yogurt and margarine tubs (porous, they absorb odors), zip-lock bags as permanent storage (insects chew through them), and the original cardboard or paper packaging inside the pantry.
How do you keep the pantry organized in 15 biweekly minutes?
The most well-organized system in the world falls apart within two months without upkeep. Keeping a pantry organized takes far less time than organizing it from scratch, as long as the upkeep happens regularly.
There are two upkeep rhythms that work well together:
Biweekly upkeep (15 minutes)
Every two weeks, ideally on the same day as your bigger weekly grocery trip, set aside 15 minutes to go through the pantry following this list:
- Pull all items forward and place new purchases behind them (FIFO)
- Check expiration dates on the oldest products
- Clean up any spills or stains on the shelves
- Note what is running low for the shopping list
- Check for any signs of pests (dust, webbing, insects)
- Refill bay leaves in grain containers if needed
Biannual upkeep (1 to 2 hours)
Twice a year (at the start of the year and in July, for example), do a complete pantry review:
- Full inventory with a check of every expiration date
- Deep cleaning of every shelf, including the corners
- System check: are the containers the right size? Do the zones still make sense for the family's current consumption?
- Replacing cracked containers or lids with worn-out seals
- Review of seasonal items (holiday treats, Easter chocolates, and so on)
With biweekly upkeep in place, the biannual review becomes much faster, and you will always be at most two weeks away from a pantry in order.
Frequently asked questions about pantry organization
Do I need to buy containers before organizing the pantry?
No. Do the full inventory first: empty everything out, discard expired items and anything you no longer use. It is very common to free up enough space without buying anything at all. Only once you know what is left and have measured the shelves can you buy the right containers, without wasting money.
How do I keep weevils out of the pantry?
Transfer every grain and flour into rigid plastic or glass containers as soon as you get home from shopping. Never store them in the original cardboard box or a loose plastic bag. Add 1 to 2 dried bay leaves inside each container: it is an effective natural repellent. For new purchases, put the packages in the freezer for 48 hours before opening and transferring them into containers, which kills any insect eggs that may have come from the store.
How do I organize a small pantry with limited space?
The solution lies in going vertical and using dead space. Use stackable acrylic can organizers to gain extra layers. Install additional inner shelves between the existing fixed ones. Add a door-mounted organizer on the inside of the pantry door for spices, oils, and condiments. Attach a magnetic spice rack to the side of the cabinet. With these adjustments, you can double your capacity without any renovation work.
How often should I reorganize the pantry?
There are two rhythms: a 15-minute biweekly upkeep, which means applying FIFO (placing new purchases behind older ones), checking expiration dates, and refilling bay leaves; and a 1 to 2 hour biannual reorganization, where you do a full inventory, deep clean, and adjust the system to match changes in the family's consumption. When biweekly upkeep is kept current, the biannual reorganization becomes much faster.
Prefer to have a professional handle it?
Pantry and kitchen organized by a professional in São Paulo
Silvana Organizer organizes pantries, kitchens, and every room in São Paulo. A system tailored to your routine. Project assessment included.
Request a quote on WhatsAppServing São Paulo and the surrounding region

About the author
Silvana Santanna →Personal Organizer in São Paulo, specialized in residential move organization and functional organizing projects for homes, closets, kitchens, trousseaux and home offices. Creator of the Casa Pronta™ Method, with more than 100 projects completed across São Paulo and the greater metro area.
Ready to have your home organized
without lifting a finger?
Project assessment visit.